How to Use an Electrum Bitcoin Wallet: The Complete 2026 Setup Guide for Beginners and Hardware Wallet Users

- What Exactly is an Electrum Wallet and Why Should You Care?
- How to Download and Install the Electrum Wallet Safely (2026 Edition)
- Creating a Standard Wallet and Backing Up Your Seed Phrase
- Receiving Bitcoin: The Step-by-Step Guide
- Sending Bitcoin: Fees, Addresses, and Confirmation
- How to Use an Electrum Wallet with a Ledger Hardware Device
- Pro Tips: Watching-Only Wallets and Customization
- Security, Backup, and Avoiding the "I Lost My Bitcoin" Tragedy
- Frequently Asked Questions About the Electrum Bitcoin Wallet
Most cryptocurrency participants who have ever interacted with Bitcoin have likely heard of Electrum, a prominent lightweight desktop wallet that carries major influence in the crypto community. When I first engaged with Bitcoin in 2017, I encountered the critical pitfall of downloading the full blockchain: the entire chain’s data takes up a full 600GB of hard drive space, which creates an extremely high entry barrier for ordinary users. Electrum’s core advantage directly solves this pain point: it does not require users to download the complete blockchain, instead only connecting to remote servers to obtain transaction data, balancing speed, efficiency, and security. This guide starts with basic novice operations including creating a wallet, backing up mnemonic phrases, and sending and receiving Bitcoin. It goes on to cover advanced operations such as integrating Ledger and Satochip hardware wallets, as well as professional-grade security techniques. The Bitcoin market data cited in this article comes from CoinMarketCap, and its financial data comes from TradingView to ensure accuracy, making this a one-stop resource to help you become an expert in using Electrum.

What Exactly is an Electrum Wallet and Why Should You Care?
Many new Bitcoin users who are just getting started with the asset often ask: What exactly is the Electrum wallet, and why has it built up a large base of loyal users across the Bitcoin community? First launched in 2011, this long-standing open-source lightweight Bitcoin wallet does not require users to download the complete blockchain. It only pulls transaction data from ElectrumX servers, so it can be fully deployed within minutes even on outdated devices. This design avoids the high operational threshold of the Bitcoin Core full-node wallet, and it also eliminates the transparency flaws that plague proprietary wallets. It is compatible with mainstream hardware wallets including Ledger, Trezor, and BitBox02. It also supports the creation of "watch-only" wallets that can monitor cold storage assets without exposing private keys, making it suitable for the full spectrum of users, from first-time newcomers to seasoned long-term coin holders. Its lightweight nature is extremely attractive to desktop users who do not want to run a full node, and its flexibility stands as its core differentiated competitive advantage.
How to Download and Install the Electrum Wallet Safely (2026 Edition)
Let's walk through the safest way to get Electrum on your machine — step by step. I’m writing this from experience: the number of fake Electrum downloads out there is staggering. One wrong click and your Bitcoin could vanish. So we’ll take it slow and get it right.
Then double‑click the AppImage to launch.
All serious Bitcoin holders must update their cryptocurrency wallet software in a timely manner. The well-known wallet Electrum frequently pushes security patches; as of mid-2026, its latest stable version is 4.5.2, and users can check for new versions at electrum.org. Data from CoinMarketCap shows that Bitcoin accounts for approximately 40% of the total cryptocurrency market share, so it is essential to have this type of secure wallet properly set up.
Creating a Standard Wallet and Backing Up Your Seed Phrase
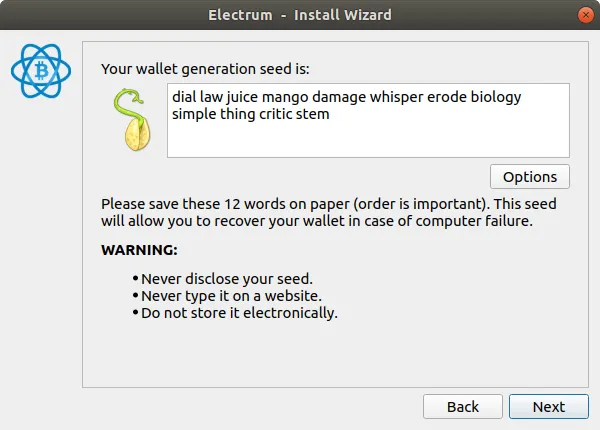
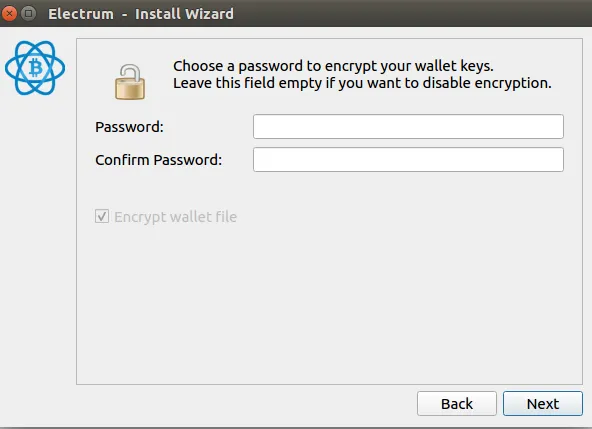
This is a practical guide to creating an Electrum wallet, developed for first-time cryptocurrency users. This section breaks down the full process of creating a wallet from scratch strictly following the order of user operations. After launching Electrum, the wallet creation wizard will trigger. The first step is naming the wallet; the system default name is default_wallet, and we recommend using descriptive names such as MyMainBTC or SavingsVault to easily distinguish the purpose of each wallet. Next comes the wallet type selection step. We advise that 99% of regular users choose the Standard wallet: for this type of deterministic wallet, all addresses and keys are derived from a single seed phrase. Users will then enter the keystore interface, which offers four native options: create a new seed, use an existing seed, use a master key, or use a hardware device. Users building a wallet from scratch must select the "create a new seed" option. Following this is the most critical security checkpoint in the entire process: Electrum will generate a 12-word seed phrase, which is the only credential to recover your Bitcoin if your computer is damaged or stolen. It is absolutely forbidden to take a screenshot of the phrase, save it as a local text file, or email it to yourself. To confirm the seed phrase, you must enter it manually in the correct order, and copying and pasting is prohibited. Finally, you need to set an encryption password for your local wallet. This is like locking the door of your home—it adds an extra layer of protection even for assets stored in a safe, reinforcing a second strong line of security defense.
Receiving Bitcoin: The Step-by-Step Guide
Alright, your wallet is set up. Now, how do you actually get some Bitcoin into it? It's pretty straightforward, but I’ll walk you through the process based on my own experience. Open your Electrum wallet and look for the "Receive" tab. When you click on it, you'll see a blank slate. You have the option to add a description for the transaction—this is incredibly helpful for keeping track of who sent you money, especially if you manage multiple payments.
If a friend owes you 0.01 BTC, you can use the Electrum Bitcoin wallet to request payment: first enter the amount you need to collect, and the system will generate a payment request that includes a unique dedicated address and a QR code. You can click "Request" to copy the address and send it to the other party, or you can have the other party scan the QR code with their mobile wallet to complete the payment.
Early in my own experience, I encountered a common pitfall when transferring cryptocurrency, so I specifically remind everyone to carefully and repeatedly verify the recipient address before sending any crypto assets. A prevalent address scam widespread in the cryptocurrency space works as follows: malicious software modifies the legitimate address stored in a device’s clipboard, replacing it with the attacker’s own address. My habit to avoid this pitfall is to read out loud the first and last characters of the address before initiating a transfer. The "Receive" tab of a cryptocurrency wallet displays all historical inbound transactions, allowing users to check in real time whether funds have arrived. According to data from CoinMarketCap, Bitcoin transaction confirmations typically take 10 to 60 minutes, a timeframe that fluctuates based on network congestion, so there is no need to feel anxious about this normal delay.
Sending Bitcoin: Fees, Addresses, and Confirmation
For users preparing to send Bitcoin, first navigate to the Send tab of your wallet. Paste the recipient’s Bitcoin address into the Pay to field, then enter the transfer amount in the Amount field. The amount’s unit can be switched between BTC and mBTC; if the price feed function is enabled, the amount can also be switched to display the fiat equivalent. When I carry out this operation in practice, I always verify the address character by character, because any incorrect input will lead to the permanent loss of the assets.
When processing cryptocurrency transactions, transaction fees serve as the next core operational node. The Electrum wallet provides a slider that supports custom transaction fee settings: high fees can speed up miner confirmation of transactions, which is especially useful during network congestion, while low fees, despite cutting costs, may leave transactions stuck in the mempool for an extended period. I will first check the recommended fee values from Mempool.space, and will subsequently outline typical transaction fee ranges adapted to different network conditions.
| Network Congestion | Low Fee (sat/vB) | Medium Fee (sat/vB) | High Fee (sat/vB) |
|---|---|---|---|
| Low | 1-5 | 5-10 | 10-20 |
| Medium | 5-15 | 15-30 | 30-60 |
| High | 15-50 | 50-100 | 100+ |
The process of transferring Bitcoin using the Electrum wallet is clear and controllable: first, verify all information before clicking the send button, confirm the three details that pop up in the wallet—recipient address, transfer amount, and transaction fee—enter your password to submit the transaction, and it will then be broadcast to the Bitcoin network. When I first transferred a large sum of assets, I was extremely nervous, yet this process proved to be smooth and reliable. Users can track the transfer’s progress on the wallet’s History tab, and can also monitor its status via CoinMarketCap and TradingView. If network congestion occurs, do not panic; you only need to wait for the block confirmations to complete.
How to Use an Electrum Wallet with a Ledger Hardware Device
One of Electrum’s core strengths is its ability to seamlessly integrate with Ledger hardware wallets, creating a solution that combines the best of both worlds: Electrum’s own user-friendly operation interface and the top-tier security protection of hardware wallets. Next, we will complete the pairing setup of the two tools step by step: First, plug in your locked Ledger device and open the BTC app on it, launch Electrum’s setup wizard, name your wallet and select the standard wallet type. On the keystore page, check the hardware device option, scan to identify your Ledger device, then select an address derivation path. We recommend using the Native Segwit path; this modern standard allows you to enjoy the lowest possible transaction fees. Throughout the entire process, your private key never leaves the Ledger device, and you only need to complete a physical confirmation on the hardware when initiating a transfer. While this workflow is slightly slower, it delivers extremely high security value, making it suitable for users who hold large amounts of cryptocurrency or worry about their personal computers being hacked. The only rare compatibility exception is: older Ledger devices equipped with the legacy version of Ledger OS™ must be paired with the older Electrum 4.0.2 to connect normally.
Pro Tips: Watching-Only Wallets and Customization
Once you have fully mastered the basic operations of the Electrum Bitcoin wallet, you can unlock its core advanced features that distinguish it from comparable products. Among these features, the watch-only mode—which I have personally tested to deliver the highest practical utility—is an exceptional tool for managing Bitcoin across multiple devices. This mode allows users to view account balances and transaction records without importing any private keys. When creating a new wallet, users select the option to import a master key or Bitcoin address, then paste an extended public key or address list to generate a read-only interface. Since no private keys are stored locally, there is no risk of asset leakage. During my work trips, I rely on this mode to monitor my Ledger hardware wallet using a portable laptop, which resolves the core security pain point of managing private keys across multiple devices.
In the custom settings of the Bitcoin wallet I commonly use, there is also a manual transaction fee control function. By clicking the "Edit fees manually" option on the Send tab, users can set a fee rate denominated in sat/vB or BTC/kB. Before setting the rate, one must first check TradingView’s fee tracker and the mempool data published by CoinMarketCap, then select a rate that allows the transaction to be confirmed within 1 to 2 blocks. During off-peak network periods, the rate is set to 5 sat/vB, while during periods of network congestion, the rate is set to 30–50 sat/vB. The fee slider on the Electrum wallet meets basic usage needs, but manual rate input delivers higher precision.
Do not overlook the View menu in your Bitcoin wallet. Below are original usage tips I have compiled: The Coins tab supports UTXO management, and users can right-click to freeze or sort any specified UTXO. This function not only prevents merging inputs from different sources to protect privacy, but also allows users to merge small dust UTXOs before transaction fees rise. I perform this operation every quarter when the memory pool is idle. Under the same menu, the Addresses column lists all generated addresses, while Contacts stores frequently used payment receiving addresses, which can greatly reduce operation time.
Below is a quick reference table for fee strategies based on mempool data from TradingView (as of mid-2025):
| Mempool Congestion Level | Recommended Fee (sat/vB) | Expected Confirmation Time |
|---|---|---|
| Low (0–5 MB pending) | 5–10 | 1–2 blocks (~10–20 min) |
| Moderate (5–20 MB pending) | 15–30 | 1–3 blocks |
| High (20–50 MB pending) | 40–80 | 1–2 blocks |
| Extreme (>50 MB pending) | 100+ | Next block or skip |
These tips come from years of using Electrum both as a casual user and as part of the BTCC team’s research into secure Bitcoin management. Remember: watching-only wallets are for monitoring, not spending.
Security, Backup, and Avoiding the "I Lost My Bitcoin" Tragedy
Another hard-earned lesson: always start with a small test transaction. I cannot count how many times people have rushed to move a life savings into a new address only to panic over a mistyped character. Send a tiny amount first—like 0.0001 BTC. Confirm it arrives and you can spend it. Then proceed. According to industry data from CoinMarketCap, Bitcoin transaction errors due to address mistakes account for a significant portion of lost funds annually. Trust me, a test transaction is cheap insurance against a costly tragedy.
Frequently Asked Questions About the Electrum Bitcoin Wallet
Is the Electrum wallet safe to use?
Yes, Electrum is considered one of the safest desktop wallets due to its open-source code, long history (since 2011), and support for hardware wallets. However, safety ultimately depends on your own security practices. Never share your seed phrase, only download from the official website (electrum.org), and consider using a hardware wallet for significant amounts. The software itself is robust, but social engineering attacks targeting Electrum users are common, so stay vigilant.
How do I restore my Electrum wallet on a new computer?
To restore your Electrum wallet, download and install the software on your new computer. Launch it and choose "I already have a seed" from the keystore screen. Enter your 12-word seed phrase in the correct order. Electrum will then regenerate all your addresses and balances. You will also need your wallet password if you encrypted the wallet file. This process will work even if your old computer is destroyed, as long as you have your seed.
What is the difference between a legacy and a Segwit address?
Legacy addresses start with a "1" and are the original Bitcoin address format. They are still widely used but have higher transaction fees because they take up more space in a block. Segwit addresses start with "bc1" (Native Segwit) or "3" (p2sh-segwit). They are more efficient, meaning lower transaction fees and faster processing. For new wallets, Native Segwit is always the best choice for its cost-effectiveness and future-proofing.
Can I use Electrum without a hardware wallet?
Absolutely. While Electrum is fantastic with hardware wallets, it can also function perfectly as a standalone software wallet. In this mode, your private keys are stored in an encrypted file on your computer. This is fine for small amounts or testing. For larger holdings or long-term storage, a hardware wallet is strongly recommended to protect your keys from malware and keyloggers.
How do I change the network fee in Electrum?
In the "Send" tab, after entering the recipient's address and amount, look for the fee section. You will see a slider bar. Dragging it to the right increases the fee (faster transaction confirmation), while dragging it to the left decreases it (slower confirmation). For precise control, you can click "Edit fees manually" to enter a specific fee rate in satoshis per byte (sat/b). Always check current mempool conditions to avoid overpaying.
https://support.ledger.com/article/115005161925-zd
https://satochip.medium.com/electrum-bitcoin-client-how-to-use-in-10-easy-steps-207b04691c9d

Log in to Reply
Log in to comment your thoughtsComments
Related Articles
|Square
Get the BTCC app to start your crypto journey
Get started today Scan to join our 100M+ users